User Guide – Discovery Search
Index:
- Performing Basic Searches
- How Can I Do More with the Search Panel?
- Searching for a Phrase
- Searching for Any Specified Words or Phrases
- Excluding Words or Phrases
- Searching Using Wildcard Characters
- Grouping Terms Within a Query
- Your Space in Primo
- Using e-Shelf
- Using the Brief Results
You can search very easily in Primo. Just type one or more words you are looking for and click the “Search” button.
Note: Primo assumes that you are searching for all the words you type unless OR or NOT are specified between the words and phrases.
Once you are familiar with the basic Primo search, you might want to try doing more with the Search panel or use the Advanced Search option. Both of these options offer numerous features for making your searches more precise and enable you to get results that are more useful.
To search for a phrase, type quotation marks around the phrase. You can combine both words and phrases in your search.
Note: If you do not enclose the phrase with quotation marks, the system will find items that contain the individual words in the phrase, regardless of whether these words are located next to each other in the order specified.
For example, to search for “Sherlock Holmes” as one term, type the following in the search box:

You can search for items that contain at least one of the words or phrases you type in the Search box. To do so, type “OR” between the words or phrases.
Note: If you search for words or phrases without specifying “OR” or “NOT”, Primo assumes that you are searching for all the specified words or phrases.
For example, to search for items with the word “Sherlock Holmes” or the word “Abductive reasoning”, type the following in the search box:
Note: To use Boolean operators (AND, OR, NOT) within search phrases, you must enter them in uppercase letters. Otherwise, Primo removes them and performs a simple search that includes all search phrases.

You can exclude items that contain specific words or phrases. To do so, type NOT and then type the word or phrase to exclude.
Note: If you search for words or phrases without specifying OR or NOT, Primo assumes that you are searching for all the specified words or phrases.
For example, to search for items with the word “Sherlock Holmes” and exclude any of these items with the word “Conan Doyle”, type the following in the search box:

You can include the following wildcard characters in your searches:
? – enter a question mark to perform a single character wildcard search. For example, type wom?n to search for records that contain the strings woman, women, and so forth.
* – enter and asterisk to perform a multiple character wildcard search. For example, type cultur* to search for records that contain strings, such as culture, cultural, and culturally.
Note: The system ignores wildcard characters placed at the beginning of search terms. For example, the system treats the search terms ?aying and *aying as if you had searched for aying.
You can use parentheses to group terms within a query. For example, to search for “Sherlock Holmes” and either “Abductive reasoning” or “Forensic science”, type the following in the search box:

My Library Record enables you to view the contents of your library card and perform library services, such as renewing a book or canceling a request. In addition, it lets you define your personal Primo settings. To access My Library Record, click the My Library Record link, which appears at the top of each page in Primo.
You can tailor the Primo user interface so that it reflects the way you usually search. For example, you can specify the default language, the maximum numbers of search results per page, your default e-mail address, and your cell phone number. To set your preferences, click the Personal Settings option on the left side of My Library Record.
Note: To keep your settings for future sessions, you must sign in and save your preferences
e-Shelf allows you to save and organize items that you find during your Primo session. To access e-Shelf, click the e-Shelf link at the top of the page.
When you select the Star icon for an item in the search results, the system highlights the icon and adds the item to the Basket folder in e-Shelf.

Note: You must sign in to save items in e-Shelf for future sessions.
To remove an item and all of its copies in the various folders in e-Shelf, select the highlighted Star icon next to the item in the search results.
If you do not want to delete all copies of an item in e-Shelf, you must remove each copy directly from e-Shelf. For more information on removing items from e-Shelf, see Managing Items.
To view items that are saved in e-Shelf, click the Basket folder or any of its subfolders. From the list of items, click the item that you want to display.
The Brief results display all the items that match your search query. For each item, the following information displays:
- Resource Type – the format of the item, such as book, article, journal…….
- Title – Depending on your institution’s configuration, clicking the title displays either the item’s information or the online resource.
- Author and date – the item’s author, creator, and publication date
- Star icon – click the Star icon next to the title to add or remove the item from your basket. A highlighted star indicates that you have already added it to your basket.
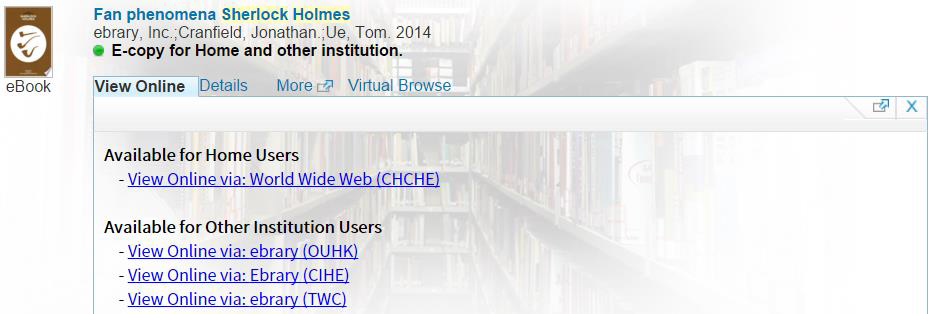
The View Online tab displays items that are available online inside the tab. If the item has multiple entries, click an entry to display the item on a new page.
The Locations tab lists all of the locations that hold this item. To get more information on the location that holds the item, click either the location link or the Plus icon.
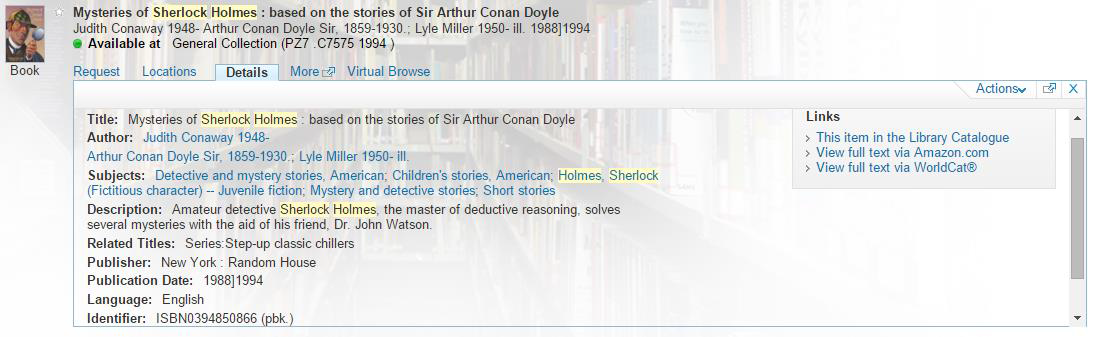
The Details tab displays the item’s full record and additional links.
The More tab displays additional links, such as provided by the SFX link resolver.

A query is a word or phrase you specify in the search panel to request information. You can do the following with queries:
- View the current session’s queries and results.
- Save a query from the current session in order to use it later.
- Activate alerts on your saved queries to have them run automatically at scheduled times to provide you with updated results from queries.
If you are signed in, you can save a query by clicking the Save Search link, which appears below the facets on the Brief Results page. You can access your saved and session queries by clicking either the e-Shelf or My Account link and then clicking the My Queries tab.
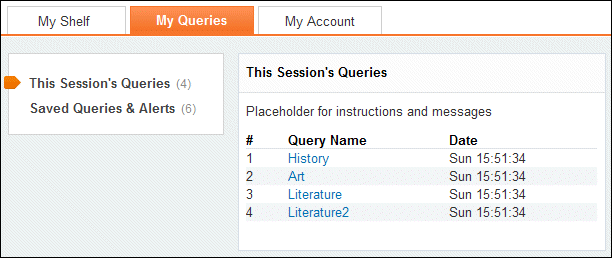
- This Session’s Queries – this folder lists all of the queries that you have performed in the current session.
- Saved Queries & Alerts – this folder lists all of the queries and alerts that you have saved.